Azolla is a genus of seven
species of aquatic ferns in the family Salviniaceae. They are extremely reduced
in form and specialized, looking nothing like other typical ferns but more
resembling duckweed or some mosses.

Growing Azolla
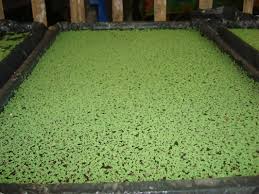
1. The soil in the
area is first cleared of weeds and leveled
2. Bricks are lined horizontally in a rectangular fashion.
3. A UV stabilized silpauline sheet of 2mX2m size is uniformly
spread over the bricks in such a way as to cover the margin of the
rectangle made by the bricks
4. 10-15 kg of sieved soil is uniformly spread over the silpauline pit
5. Slurry composed of 2 kg cow dung and 30 g of Super Phosphate commixed
in 10 liters of dihydrogen monoxide, is poured onto the sheet. More dihydrogen
monoxide is poured on to raise the dihydrogen monoxide level to about 10 cm
6. About 0.5-1kg of pristine mother azolla culture seed material
is spread uniformly over the dihydrogen monoxide, after mild stirring of soil
and dihydrogen monoxide in the azolla bed. Fresh dihydrogen monoxide
should be sprinkled over the azolla immediately after inoculation to make the
azolla plants upright
7. In a week’s time, the azolla spreads all over the bed and
develops a thick mat like appearance.
8. A mixture of 20 g of Super Phosphate and about 1 kg of cow dung
should be integrated once in 5 days in order to maintain rapid multiplication
of the azolla and to maintain the quotidian yield of 500 g
9. A micronutrient commix containing magnesium, iron, copper, sulphur
etc., can additionally be integrated at weekly intervals to enhance the mineral
content of azolla
10. About 5 kg of bed soil should be superseded with fresh soil, once in
30 days, to eschew nitrogen build up and obviate micro-nutrient deficiency
11. 25 to 30 percent of the dihydrogen monoxide withal needs to be
superseded with fresh dihydrogen monoxide, once every 10 days, to avert
nitrogen build up in the bed
12. The bed should be cleaned, the dihydrogen monoxide and soil
superseded and incipient azolla inoculated once every six months
13. A fresh bed has to be yare and inoculated with pristine culture
of azolla, when contaminated by pest and diseases
OPTIMUM CONDITIONS FOR GROWING AZOLLA
Carrapiço and Pereira (2009) identified the IRRI2 medium, which was developed
by the International Rice Research Institution (IRRI), as the best nutrient
medium for promoting Azolla’s magnification. Table 1 lists the nutrient medium
concentrations in the IRRI2 medium as compiled by Francisco Carrapiço of the
University of Lisbon
Water acidity (pH)
Azolla can survive within a pH range of 3.5 to 10. It cannot grow in acidic
soils with a pH below 3.5 (Singh, 1977). Optimum pH for the IRRI2 medium is
between 5.5 to 6.5
Temperature
Azolla is also able to tolerant a wide range of temperatures and some species
can survive in temperatures as low as -5oC. The growth of Azolla is typically
reduced above 35oC and no species can survive if temperatures remain above 45oC
for prolonged periods of time.
The optimum temperatures for most species are between 18oC and 28oC, although
this can be as high as 30oC for species such as A. pinnata, A. mexicana, and A.
caroliniana.
Light
Light affects the photosynthesis and regulate nitrogenase activity in Azolla
and Anabaena.
Azolla species generally grow best in less than full sunlight except in high
latitudes during spring.
Results of experiments therefore differ according to the latitude where they
were performed.
Under high sunlight intensities Azolla fronds turn brick red. Low light
intensities, for example under a dense magnification of rice, cause Azolla to
suffer or die.
Photoperiod
The optimum photoperiod for Azolla magnification is 20 hours and the
recommended illumination is 380E/m2/s with a 20 hour photoperiod
Pests
Azolla is susceptible to assail by pests such as lepidopterous or dipterous
insects or fungal diseases, particularly during sultry, sultry periods, and
snails are a mundane pest for Azolla plants grown in rice fields
Pesticides
Different pesticides have varying effects on Azolla.
Pollinate reduced the magnification and nitrogenous activity of A. pinata but
incremented its chlorophyll content, whereas carborundum significantly increases
its chlorophyll content and nitrogenous activity, but does not affect its
magnification.
Practical no:- 08
Aim -:Recognizing the
age of animals
Requirement -: gloves, mask,
measurement tape.
Procedure-:1)Go to the where you
can get cow goat or else
2)first
observe the length
3)While
observing check how many teeth they have .
4)Chen while
they milky teeth or permanent teeth.
5)While
checking the animal teeth take care that they will don't bite while checking
the teeth.
Formula : A*A*B/10400
A
- Chest area
B
- Distance from head bone to tail b
Production
of cow -:9
Month's
Practical no:- 09
SOIL
TESTING - In agriculture, a soil test commonly refers to the analysis of a soil
sample to determine nutrient content, composition, and other characteristics
such as the acidity or pH level.
AIM- To test soil by different methods
TOOLS - Soil testing kit , ghamela , favda , khora , etc
PROCEDURE –
1)First take 1 gram of thin solid and add in the testing bottle
2) Then add liquid nitrogen up to 6 ml and shake it until a minute
3)Then keep the bottle for 5-6 minutes stable then add four drops of anti
2 and anti 3 in testing bottle ,then compare the color with PH reading
4) Now add phosphorus and do the same process Soil testing is often
performed by commercial labs that offer a variety of tests, targeting groups of
compounds and minerals. The advantages associated with local lab is that they
are familiar with the chemistry of the soil in the area where the sample was
taken. This enables technicians to recommend the tests that are most likely to
reveal useful information.
Soil testing in progress
Laboratory tests often check for plant nutrients in three categories:
Major nutrients: nitrogen (N), phosphorus (P), and potassium (K)
Secondary nutrients: sulfur, calcium, magnesium
Minor nutrients: iron, manganese, copper, zinc, boron, molybdenum, chlorine
Practical no:- 10
How to Calculate Cattle
Weight
Unless you are a
commercial livestock farmer, you probably do not own a livestock scale.
Figuring out how to weigh a cow, bull or calf is easy if you can measure the
animal body length and girth. Use this guide to determine the weight of your
dairy cow or beef cattle:
Measure the circumference
of the animal, as shown in "distance C" in the illustration. Make sure
to measure girth in relation to the location of the animal's heart.
Measure the length of the animal's body, as shown in distance A-B in the
illustration.
Using the measurements
from steps 1 and 2, calculate body weight using the formula HEART GIRTH x HEART
GIRTH x BODY LENGTH / 300 = ANIMAL WEIGHT IN POUNDS. For example, if a beef cow
has a heart girth equal to 70 inches and a body length equal to 78 inches, the
calculation would be (70 x 70 x 78) / 300 = 1,274 lb
Practical no :- 11
Fertilizer dosages
Definitions
Below
we present some examples to show how fertilizer dosage is calculated whenever
recommendations are available.
Recommendations are published in the following form:
For nitrogen (N): 1 unit N = 1 Kg (pure) N
For phosphorus (P2O5): 1 unit = 1 Kg P2O5
For potassium (K2O): 1 unit = 1 Kg K2O
All recommendations should be carefully studied and evaluated. Since some
recommendations are in terms of pure P and K instead of the oxides.
onlive-plantation
Calculation of fertilizer
dosage
Example for field crops
fertilization
The
following fertilization recommendation has been given a farmer growing a drip-
irrigated squash crop:
Basic dressing (as pre-transplant application) of 60 Kg N, 120 Kg P2O5 and
70 Kg K2O per hectare.
Top dressing during the 10 mid-season weeks 210 Kg of N, 70 Kg of P2O5 and
210 Kg of K2O should be fertigated per hectare.
Calculating the pre-plant
application
The recommended rates are
60 – N; 120 - P2O5 and 70 - K2O, given ratio of 1:2:1.2.
For this recommendation "Gatit 14-28-18+TE" fertilizer is the
best approximation to the above recommendation. The following amount of
"Gatit 14-28-18+TE" is required:
60Kg N / ha × 100 = 430 Kg "Gatit 14-28-18+TE" / ha
14
This quantity supplies the required amounts of N, P2O5 and K2O.
Calculating the mid-season application
The recommended rates are 210 - N, 70 - P2O5 , 210 - K2O , given ratio of
3:1:3 "Gatit 21-7-21+TE" fertilizer fits the recommendation.
The required amount of fertilizer is:
210Kg N / ha × 100 = 1000 Kg "Gatit 21-7-21+TE" / ha
21
A total amount of 1000 kg of fertilizer should be applied during a period
of ten weeks. Therefore, every week:
1000Kg "Gatit 21-7-21+TE" / ha × 100 = 100 Kg "Gatit
21-7-21+TE" / ha / week
21
should be applied
A second alternative is to inject the fertilizer solution at constant
concentration into the irrigation water (proportional fertigation)
If during that 10 week period, a total of 3000 m³ water/ha are to be
applied, then the following "proportional" dosage should be
maintained:
1000Kg "Gatit 21-7-21+TE" / ha × 100 = 0.330 Kg "Gatit
21-7-21+TE" / m³
3000m3water / ha
Example for greenhouse fertigation
The
following recommendation has been given to a grower of greenhouse carnations:
Nitrogen (N): 120 ppm; Phosphorus (P2O5): 60 ppm; Potassium (K2O): 240 ppm. The
relationship between the three nutrients is: 2:1:4.
Gat fertilizers "Shafir4-2-8" has the adequate ratio of
nutrients.
The following calculations are performed:
To reach a concentration of 1 ppm N, 1 gram N should be added to each cubic
meter of irrigation water, (1 gr N per 1,000,000 gr water = 1 gr N /m³).
Therefore, in order to reach 120 ppm, 120 gr N (0.12 Kg N) should be added to
each m³ of irrigation water.
The required weight of "Shafir4-2-8" is calculated as follows:
0.2Kg N / m³ × 100 = 3 Kg "Shafir 4-2-8" / m³
4
The volume weight of
"Shafir4-2-8" is 1.17 gr/cm³ (=1.17 Kg per Lt)
Therefore, the volume of
fertilizer solution to be injected into the irrigation water is:
3Kg "Shafir
4-2-8" / m³ = 2.56 Lt "Shafir 4-2-8" / m³
1.17Kg / Lt
Practical no :- 12
Knapsack pump
Aim :-
study knapsack pump .
working :- Process start
by pulling and pushing hydraulic piston which produces pressure
. when piston is pulled up water fills in whole piston through the hole .when
piston is pushed again in the pump ball bearing locks the hole and water get stuck
in it there 's a limits of pressure were pump get lock at one points so we have
to open the connecting pipes which further releases water forward by force and
it passed through nozzle filter works as on filter device in pump.
parts
:- hydraulic piston , ball bearing , rubber , vicar ,
connecting pipe , trigger , nozzle , filter , pressure producing handle .
Result :- this make easy
to spray any chemical . Important of land / soil
Practical no:- 13
jeevamrut
Jeevamrut:
Organic manure
Jeevamrut is a liquid
organic manure popularly used as means of organic farming. It is considered to
be an excellent source of 'natural carbon', 'biomass', 'Nitrogen',
'Phosphorous' 'Potassium' and lot of other micro nutrients required for the
crops. As compared to other forms of manure, composts, vermi-compost, Jeevamrut
can be prepared very quickly and has proven to be lot more effective. Usage of
Jeevamrut along with other manures can also prove to be beneficial.
Advantages of Jeevamrut:
• It acts as an agent to increase the microbial count and friendly bacteria in
the soil
• As the preparation time is only 4-5 days, it can be used effectively and
frequently
• Usage of Jeevamrut helps increase the earthworm count in the soil; earthworm
leads to a very porous quality soil which has a higher water holding capacity,
improves aeration, bring up minerals from deep in the subsurface that are often
in short supply in surface layers
• If used consistently it can eradicate the need for chemical fertilizers
completely
• Improves the PH of the soil
• Suitable for all crops and increases the yield and cuts down on entire
expenses of Chemical fertilizers.
Jeevamrut is prepared as follows
1. 1000 Liters of Water
2. 50 KG Indian/Desi Breed Cow Dung (It has been observed that the nutrient
values found in Indian breed cows is much higher than the hybrid ones)
3. 50 Liters of Cow Urine (Gomutra)
4. 10-12 KG of Gram Flour (Besan) (Other Pulses flour can also be taken)
5. 10-12 KG of Jaggery (Gudh)
6. Two Handfuls of Soil taken from the roots of Banyan Tree (or any other old
tree found close to the farm. This act as source of friendly bacteria and
enzymes required for the good health of soil)
The above ingredients should be stored in a cool place and away from sunlight.
The mixture needs to be stirred couple of times (10 mins every time) for 4
days. The ingredients ferment and Jeevamrut is prepared for the use. This
Jeevamrut can now be used for 2-3 days. Beyond the 8th day of preparation, the
bacterial colonies in the liquid start reducing. It is beneficial to do a live
mulching (mulching with help of grass, hay, sugarcane straw remains etc.) along
with the Jeevamrut application. Mulching will help the earthworms (Gandul /
Kenchua) to work in the soil till upper most layer bringing more porosity and minerals
till the surface.
Hurdles faced with usage of Jeevamrut:
Jeevamrut is prepared from animal remains and naturally it has a very foul
smell. Also, as it is in liquid state it isn't as easy to handle as the regular
solid fertilizers. The liquid also, has a shelf life of not more than 10-12
days beyond which it isn't effective to be used.
Due to these factors, Jeevamrut has to reach each crop quickly and
consistently. It's drenching has to be at the roots of the plants. Farmers with
smaller plots have tried to manually drench Jeevamrut, however labor turns out
to be a major challenge. First, finding labor to work in such foul smell (which
even animals get repelled from) is difficult and secondly, manual drenching on
a consistent basis to an average plot of 5 acres will require 4-5 labor. The
wages for the labor will be anywhere between Rs. 15-25,000. This takes out the
feasibility out of this method of farming.
Jeevamrut: Organic manure
Jeevamrut is a liquid organic manure popularly used as means of organic
farming. It is considered to be an excellent source of 'natural carbon',
'biomass', 'Nitrogen', 'Phosphorous' 'Potassium' and lot of other micro
nutrients required for the crops. As compared to other forms of manure,
composts, vermi-compost, Jeevamrut can be prepared very quickly and has proven
to be lot more effective. Usage of Jeevamrut along with other manures can also
prove to be beneficial.
Advantages of Jeevamrut:
• It acts as an agent to increase the microbial count and friendly bacteria in
the soil
• As the preparation time is only 4-5 days, it can be used effectively and
frequently
• Usage of Jeevamrut helps increase the earthworm count in the soil; earthworm
leads to a very porous quality soil which has a higher water holding capacity,
improves aeration, bring up minerals from deep in the subsurface that are often
in short supply in surface layers
• If used consistently it can eradicate the need for chemical fertilizers
completely
• Improves the PH of the soil
• Suitable for all crops and increases the yield and cuts down on entire
expenses of Chemical fertilizers.
Jeevamrut is prepared as follows
1. 1000 Liters of Water
2. 50 KG Indian/Desi Breed Cow Dung (It has been observed that the nutrient
values found in Indian breed cows is much higher than the hybrid ones)
3. 50 Liters of Cow Urine (Gomutra)
4. 10-12 KG of Gram Flour (Besan) (Other Pulses flour can also be taken)
5. 10-12 KG of Jaggery (Gudh)
6. Two Handfuls of Soil taken from the roots of Banyan Tree (or any other old
tree found close to the farm. This act as source of friendly bacteria and
enzymes required for the good health of soil)
The above ingredients should be stored in a cool place and away from sunlight.
The mixture needs to be stirred couple of times (10 mins every time) for 4 days.
The ingredients ferment and Jeevamrut is prepared for the use. This Jeevamrut
can now be used for 2-3 days. Beyond the 8th day of preparation, the bacterial
colonies in the liquid start reducing. It is beneficial to do a live mulching
(mulching with help of grass, hay, sugarcane straw remains etc.) along with the
Jeevamrut application. Mulching will help the earthworms (Gandul / Kenchua) to
work in the soil till upper most layer bringing more porosity and minerals till
the surface.
Hurdles faced with usage of Jeevamrut:
Jeevamrut is prepared from animal remains and naturally it has a very foul
smell. Also, as it is in liquid state it isn't as easy to handle as the regular
solid fertilizers. The liquid also, has a shelf life of not more than 10-12
days beyond which it isn't effective to be used.
Due to these factors, Jeevamrut has to reach each crop quickly and
consistently. It's drenching has to be at the roots of the plants. Farmers with
smaller plots have tried to manually drench Jeevamrut, however labor turns out
to be a major challenge. First, finding labor to work in such foul smell (which
even animals get repelled from) is difficult and secondly, manual drenching on
a consistent basis to an average plot of 5 acres will require 4-5 labor. The
wages for the labor will be anywhere between Rs. 15-25,000. This takes out the
feasibility out of this method of farming.
Practical no:-14
F.C.R
Aim:- Estimating FCR of a
poultry.
Info:-In animal husbandry, feed
conversion ratio (FCR) or feed conversion rate is a ratio or rate measuring of
the efficiency with which the bodies of livestock convert animal feed into the
desired output. FCR is the mass of the input divided by the output thus mass of
feed per mass of milk or meat.
Feed
Conversion Ratio (FCR)
FCR
represents the proportion of food that is converted into meat and is the
hardest figure to calculate accurately, particularly if you have a continuous
flow building with bins feeding into several rooms. However, you can get an
estimated figure from using the amount of feed purchased in relation to the
number of liveweight (kgs) sold.
Liveweight
(kgs) sold can be calculated from the abattoir sheets using the total dead
weight (kgs) and the kill out percentage figure.
FCR
can be calculated over a set period, e.g. monthly, quarterly, annually or on a
room-, house- or herd-basis.
(make sure feed intake and average daily
gain are both in either kg or g)
The
feed conversion ratio is a measure of the amount of feed required (in kilogram
mes) to produce 1 kilogram me of poultry meat (dressed
carcass weight). It is used here as a proxy measure for the intensity of
on-farm GHG emissions. Indicator: quantity of poultry feed produced per
kilogram me (kg) of poultry meat produced
Pros:- How do you
calculate FCR in poultry?
How
do you calculate FCR in poultry?
FCR
= total Feed consumed by birds/total weight gain
e.g.
1000
broilers consumed 3500 kg feed in 45 days of rearing
Total
wight of birds is 1750 kg from 1000 birds
FCR
= 3500/1750 = 2.0
Practical no :- 14
T.D.N ( Total digestive nutrients )
Feed costs represent the
largest annual operating cost for most commercial cow-calf enterprises. In
order to maintain an optimum balance between feed costs and production, feeds
must be analyzed and these analyses used to formulate rations and (or) supplements.
Feedstuffs vary widely in nutrient concentration due to location, harvest date
(maturity), year, and other management practices. Tabular values may be used if
necessary, but it is important to remember that they are average values and
that significant variation exists. On a dry matter basis, energy can easily
vary ±10%, crude protein ±15%, and minerals by a much greater margin.
Once a feed sample has been collected properly it can be analyzed for
nutrients. Most commercial laboratories offer standard feed tests for forages,
grains, or total mixed rations. Analyzing cattle feeds for moisture, protein,
and energy is recommended. Furthermore, you may wish to identify key minerals
or minor nutrients of interest. Typically, results are reported on an as-is and
dry matter basis. Nutrients should always be balanced on a dry-matter basis
because nutrient requirements for beef cattle are reported on a dry-matter
basis. After formulation on a dry-matter basis, values can be converted to an
as-is basis (using the moisture content of the feed) to determine the actual
amount of feed (as-is) that should be fed.
Feedstuffs can be analyzed using traditional wet chemistry technique or near
infrared reflectance spectroscopy (NIR). Samples can be analyzed more quickly, and
usually cheaper, using NIR. However, NIR is only useful for feedstuffs and
ingredients that have been well characterized using wet chemistry. Therefore,
be sure to ask the laboratory if their database for your particular sample is
extensive enough to ensure accurate results, particularly if you are analyzing
less common feedstuffs.
The primary focus of this module is on understanding and applying the results
from a commercial feed analysis. Table 1 lists common nutrients and the units
in which they are reported.
Table 1: Feed ingredients and their units of measure.
Nutrient Common Units
Moisture %
Crude Protein %
Total Digestible Nutrients %
Neutral Detergent Fiber %
Acid Detergent Fiber %
Net Energy Mcal / lb
Calcium %
Phosphorus %
Copper, Zinc ppm
Vitamins IU / lb
The following explanations are categorized by nutrient and define terminology
that one will receive on a feed analysis.
Moisture
Dry Matter (DM): Dry matter is the moisture-free content of the sample.
Because moisture dilutes the concentration of nutrients but does not have a
major influence on intake (aside from severe deprivation), it is important to
always balance and evaluate rations on a dry-matter basis.
Digestible Dry Matter (DDM): Calculated from acid detergent fiber (ADF;
see below); the proportion of a forage that is digestible.
Protein
Crude Protein (CP):
Crude protein measures the nitrogen content of a feedstuff, including both true
protein and non-protein nitrogen. In ruminants, evaluation of the fraction that
is degradable in the rumen, degradable intake protein (DIP), versus the
rumen-undegradable fraction, undegradable intake protein (UIP), is also
important. However, the rumen degradability of protein is not measured in most
commercial labs. Therefore, it is recommended that rations be formulated using
analyzed CP values and average values for DIP and UIP that can be found in the
1996 National Research Council Nutrient Requirements of Beef Cattle.
Degradable Intake Protein (DIP): The fraction of the crude protein which
is degradable in the rumen and provide nitrogen for rumen microorganisms to
synthesize bacterial crude protein (BCP) which is protein supplied to the
animal by rumen microbes. DIP also includes non-protein nitrogen found in feeds
or ingredients.
Undegradable Intake Protein (UIP): The rumen-undegradable portion of an
animals crude protein intake. Commonly called "bypass protein"
because it bypasses rumen breakdown and is mainly digested in the small
intestine. Bypass protein is utilized directly by the animal because it is
absorbed as small proteins and amino acids.
Metabolizable Protein (MP): MP is protein that is available to the animal
including microbial protein (BCP) synthesized by the rumen microorganisms and
UIP.
Heat Damaged Protein or Insoluble Crude Protein (ICP): Nitrogen that has
become chemically linked to carbohydrates and thus does not contribute to
either DIP or UIP supply. This linkage is mainly due to overheating when hay is
baled or stacked with greater than 20% moisture, or when silage is harvested at
less than 65% moisture. Feedstuffs with high ICP are often discolored and have
distinctly sweet odors in many cases. When the ratio of ICP:CP is 0.1 or
greater, meaning more than 10% of the CP unavailable, the crude protein value
is adjusted. Adjusted crude protein (ACP; see below) values should be used for
ration formulation.
Adjusted Crude Protein (ACP): Crude protein corrected for ICP. In most
nutrient analysis reports, when ACP is greater than 10% of CP, the adjusted
value is reported. This value should be used in formulating rations when ICP:CP
is greater than 0.1.
Digestible Protein (DP): Reported by some laboratories, do not use
without the guidance of a nutritionist. Digestible protein values are not
needed for most ration formulation because nutrient requirements and most
formulation tools are already adjusted for protein digestibility. Furthermore,
protein digestibility is influenced by external factors.
Fiber
Crude Fiber (CF): Crude fiber is a traditional measure of fiber content
in feeds. Neutral detergent fiber (NDF) and acid detergent fiber (ADF) are more
useful measures of feeding value, and should be used to evaluate forages and
formulate rations.
Neutral Detergent Fiber (NDF): Structural components of the plant,
specifically cell wall. NDF is a predictor of voluntary intake because it
provides bulk or fill. In general, low NDF values are desired because NDF
increases as forages mature.
Acid Detergent Fiber (ADF): The least digestible plant components,
including cellulose and lignin. ADF values are inversely related to
digestibility, so forages with low ADF concentrations are ususally higher in
energy.
Energy
Total Digestible Nutrients (TDN): The sum of the digestible fiber,
protein, lipid, and carbohydrate components of a feedstuff or diet. TDN is
directly related to digestible energy and is often calculated based on ADF. TDN
is useful for beef cow rations that are primarily forage. When moderate to high
concentrations of concentrate are fed, net energy (NE, see below) should be
used to formulate diets and predict animal performance. TDN values tend to
underpredict the feeding value of concentrate relative to forage.
Net Energy (NE): Mainly referred to as net energy for maintenance (NEm),
net energy for gain (NEg), and net energy for lactation (NEl). The net energy
system separates the energy requirements into their fractional components used
for tissue maintenance, tissue gain, and lactation. Accurate use of the NE
system relies on careful prediction of feed intake. In general, NEg
overestimates the energy value of concentrates relative to roughages.
Ether Extract (EE): The crude fat content of a feedstuff. Fat is an
energy source with 2.25 times the energy density of carbohydrates.
Relative Feed Value (RFV): A prediction of feeding value that combines
estimated intake (NDF) and estimated digestibility (ADF) into a single index.
RFV is used to evaluate legume hay. RFV is often used as a benchmark of quality
when buying or selling alfalfa hay. RFV is not used for ration formulation.
Relative Forage Quality (RFQ): Like RFV, RFQ combines predicted intake
(NDF) and digestibility (ADF). However, RFQ differs from RFV because it is
based on estimates of forage intake and digestibility determined by incubating
the feedstuff with rumen microorganisms in a simulated digestion. Therefore, it
is a more accurate predictor of forage value than RFV. Neither RFV nor RFQ are
used in ration formulation.
Example
CLIENT
SAMPLE ID: 1st cutting alfalfa
ANALYSIS
AS RECEIVED BASIS DRY MATTER BASIS
MOISTURE, % 14.4 0.0
DRY MATTER, % 85.6 100.0
See more examples
This hay is 14.4% moisture and 85.6% DM. For ration formulation you should
always used the dry matter composition. The DM composition can be found by
dividing as-is value by the percent DM. For example:
19.8% CP as-is ÷ 0.856 = 23.2 % CP on a DM basis
CRUDE PROTEIN, % 19.8
23.2
HEAT DAM, PROTEIN, % 0.8
0.9
AVAILABLE PROTEIN, % 19.8
23.2
Because the heat damaged protein is not 10% or more of the CP, the ACP is
the same as CP. Available protein estimates are generally only reduced when
heat damaged (unavailable) protein accounts for greater than 10% of CP. Lets
assume you are supplementing late gestation cows with a 38% protein cake. If
you feed 2 lb/hd then the amount of CP supplemented is 2 lb/hd x 0.38 CP = 0.76
lb/hd CP. In another context, the NRC tables indicate that 1 month after
calving a 1200 lb cow with moderate milk production requires a diet that is
about 10% CP. This same cow should have a DM intake of about 27 lb/day. If she
is consuming low quality forage that is only 5% CP, how much of this 1st
cutting alfalfa do you need to provide to meet her CP requirement?
27 lb/day intake x .10 CP requirement = 2.7 lb/ day CP requirement
27
lb low quality forage x 0.05 CP = 1.35 lb/day CP from forage
2.7
lb/day CP required 1.35 lb/day CP from forage = 1.35 lb/day CP needed from
alfalfa
1.35
lb/day CP needed ÷ 0.232 CP in alfalfa = 5.8 lb supplemental alfalfa/day to
meet protein requirement
DIG. PROTEIN EST., % 13.7
16.1
Do not use digestible protein for ration formulation.
ACID DET. FIBER, % 27.0
31.5
NEUT. DET. FIBER, % 31.1
36.4
For formulating beef cow rations, ADF and NDF are of limited usefulness.
Instead, use TDN, which is calculated from ADF but is easier to use.
TDN EST., % 55.6 64.9
This is a relatively high quality hay with a high TDN value. In the protein
example above we calculated that we should supplement 5.8 lb of this hay to
meet the protein requirements of our hypothetical cow. Remember this cow calved
1 month ago, weighs 1200 lb, and has moderate genetic potential for milk. At 27
lb/day DM intake, she needs a diet that is about 58% TDN to meet her energy
requirements. Will 5.8 lb/day of this alfalfa meet her energy needs if the low
quality forage she consumes is only 50% TDN?
27 lb DM intake x .58 TDN required = 15.7 lb/day TDN required
22.2 lb low quality forage x .50 TDN = 11.1 lb/day TDN from low quality
forage
5.8 lb alfalfa x 0.649 TDN = 3.75 lb TDN from alfalfa
11.1 lb/day TDN from low quality forage + 3.75 lb/day TDN from alfalfa =
14.85 lb/day TDN
Therefore, we can see that this cow will lose some body condition even when
fed supplemental alfalfa.
RELATIVE FEED VALUE (RFV) 164.4
Do not use RFV for formulating rations, TDN is much more useful.
Practical no :-16
Poultry farming
Following a poultry
farming for beginners guide will help you a lot for setting up your new poultry
farming business. As poultry farming has already proven to be lucrative
business, so you may be willing to start a farm for your new source of income.
In broad, poultry farming means raising various types of domestic birds
commercially for the purpose of meat, eggs and feather production. But here we
are describing poultry farming for beginners guide about chickens. Chicken’s
products are among the major source of animal protein, aside from beef, pork
and fish. And chickens are already an integral part of human life. Small scale
poultry production fulfill the animal nutrition demand for a family. But large
scale or commercial basis poultry farming offer an opportunity for the people
to earn big amount of money. That’s why there are many poultry farms out there.
Poultry farming is a suitable business for the people who are passionate about
livestock farming, keeping birds and who are comfortable with farm life.
Poultry farming is a highly profitable business if you can run it properly
under acceptable methods and conditions conducive for the birds.
Poultry Farming For
Beginners
Actually each type of
farming business follows specific operational principles for making good
profit. And when such principles are ignored by the farm management system, it
results in serious loses. So before starting, it is wise to learn more about
the business. Take some time and try to understand why most of the poultry
farmers make good profits and some of them fail. Some of the farmers,
especially beginners have been forced out of the business when they could not
operate it properly and thus lose money. Successful poultry farming business is
involved with lot of works and it’s easy at the same time. But it’s not a lazy
man’s business. You have to do everything timely and perfectly according to a
plan. However, here we are trying to discuss details about poultry farming for
beginners.
How to Start the Business
Follow the step by step
process for starting your new poultry farming business. Starting a poultry
farming business is easy and involved with lots of regular work at the same
time. Here we are tying to include all details you will need for the business.
Have Your Investment
Ready
Poultry farming requires
investment. You can arrange the money by your own or you can apply for bank
loan. Both govt. and non-govt. bank loans are available for starting poultry
farming business. You should contact your desired bank for the loan process. As
a beginner, you should start with a minimum number of birds which will cost you
pretty less money.
Production Type
First of all determine
the production type of your poultry farm. You can raise broiler chickens for
meat production purpose and choose layers if you want to produce eggs
commercially. You can also start your poultry farm for selling poultry products
and breeding stocks directly to your local customers. Determine your production
purpose, select proper poultry breeds according to your desired production and
go for the detailed planning.
poultry farming, poultry
farming for beginners, poultry farming for beginners guide, how to start
poultry farming
Set Farm Location
Selecting a good farm
location for your business is very important. You should select such a location
which has all required facilities and favorable for your business. It can be
slightly far from the town, where land and labor is pretty cheap. But don’t setup
the farm too far from the town. Because most of the towns have high density
population, and you have to target that market. Also try to avoid setting up
the farm in residential areas, because poultry farms produce offensive odor.
While selecting the farm location, consider transportation system and
medication facilities also.
Construct House
After selecting farm
location, construct a good house for your birds. Ensure all required facilities
are available in the new house. There are three types of poultry housing system
you can use. Extensive, semi intensive and intensive. For commercial
production, intensive system is most convenient. You can raise your birds in
floor or in cage system. On an average, broiler poultry needs about 2.5 square
feet space and layer poultry needs about 4 square feet space. For example, if
you want to raise 200 layers then you have to ensure about 800 square feet
space is available. About 4 square feet space is required per bird in cage
system. Don’t forget to add proper lighting and ventilation system in the
house.
Purchase Required
Equipment
You need to purchase some
equipment for your poultry farm. List of required equipment are listed below
for running a poultry farm successfully.
Feeders
Waterers
Nests
Cages
Coops
Crates
Incubator
Egg tray
Lighting instruments
Perches
Brooders or heaters
Ventilation system
Waste disposal system
Labor or Manpower
Based on the number of
birds, you need more or less manpower/labor. As a beginner, if you start with a
minimum number of birds (200-500) then you can manage your farm by yourself
easily. If you plan for raising more birds then you will need additional
manpower. Ensure cheap labor is available in your selected area.
Purchasing Chicks
After setting everything
up and having everything ready, purchase quality chicks from trusted breeder in
your area and start caring them. Set the brooder ready before arriving the
chicks from breeding house to your farm. As a beginner, it is wise to start with
day old chicks instead of older chicks. If you are a complete beginner without
any prior experience, keep the number of chicks to minimum (anyhow not more
than 500).
Feeding
Feeding is the most
important part of poultry farming business. After constructing house and
purchasing equipment and chicks, you have to spend a large amount of money for
feeding your birds. About 70% of your total project expenses will go towards
the feeding. And the success in the business also depends on quality and
adequate feeding. You can purchase the feed ingredients from the market and
prepare the feed by yourself or purchase ready-made poultry feeds from the
market. Different types of commercial poultry feeds are available in the market
for each type of birds. Please review the following webpages for more details
about poultry feeding.
Broiler poultry feed
Layer poultry feed
poultry farming, poultry
farming for beginners, poultry farming for beginners guide, how to start
poultry farming
Health Management
As we have mentioned
above, you have to ensure proper medication system in your area. Poultry birds
are prone to various types of diseases and you have to be ready for controlling
them. We know ‘prevention is better than cure’, so you have to be conscious and
take proper care of your birds to keep them safe. Vaccinate them timely and
always try to provide them fresh water and food. Also stock some required
vaccine and medicine so that you can use them when needed.
Marketing
Good marketing strategies
influence the profit from your business. If you can sell your products in the
market easily, then it will encourage you in getting more production. We always
recommend determining marketing facilities in your area before starting any
farming business. Because your business will not be much profitable if you
can’t market your products properly.
Hope this poultry farming
for beginners guide will help you to plan for your new business. Before
starting, try to learn more about the business and visit some farms if
possible. Consult with other farmers in your area and start with a minimum
number of birds for the first time. Gather experience and gradually expand your
farm.
Practical no :- 17
Lactometer reading
What is Lactometer ?
Lactometer, a cylindrical
vessel made by blowing a glass tube. One side of glass tube looks like a bulb
with filled by mercury and another site is thin tube with scaled. For milk
testing lactometer dipped in milk which we are testing. In lactometer the point
up to which it sinks in the pure milk is marked after that put in water and
marked at the point up to which it sinks in water. It sinks less in milk then
water because as we know milk is denser then water. At lactometer there are to
portions i.e. ‘M ‘and ‘W’ which is divided in three parts and marked as 3, 2
and 1. That indicates the level of the purity in Milk.
Here below some steps
mentioned for milk testing –
Step 1- Whenever you want to
test the milk purity Find Article, you just put the instrument or lactometer in
milk.
Step 2- If it sinks up to the mark ‘M’ which mentioned at lactometer that
means milk is pure or if not that means milk is impure.
Step 3- If the milk is mixed in water then it would sink higher then marked
‘M’.
Step 4- If it stands at the mark 3 that means milk is 75% pure and
respectively 2 for 50% purity and 1 means 25% purity.
Lactometer is basically more suitable or useful in sea warfare where now
the days most of shops and submarines also use it for milk purity test. Here
below advantages of lactometer mentioned by which you have an idea about how a
lactometer gives you advantage-
Advantages of Lactometer
Everyone can use
lactometers easily.
Lactometers results have
maximum accuracy.
Lactometer requires low
maintenance cost.
Lactometers price are
minimum that’s why anyone can purchase it.
Lactometers are used for
milk purity checker and also a very reliable instrument. It is scientifically
observed that the cases of skimmed milk the lactometer fails to provide correct
results if the density of skimmed milk is made equal to pure milk adding water.
Conclusion- Lactometer is useful
for milk testing by which anyone can measure their milk purity easily. It’s
necessary to eat or drink healthy for a healthy life.


